
Create Your First Service Flows
Create Your First Service Flows
This tutorial will guide you through creating service flows on the MelodyArc Platform. Service flows consist of a series of points that outline how tasks are serviced. In this example, the service flows will handle receiving, processing, servicing, and responding to a task. The concepts covered, although simplified for demonstration purposes, are fundamental to building robust, production-ready service flows.
Prerequisites
To successfully complete this tutorial, you will need:
- An active MelodyArc account
- Permissions to create points within MelodyArc
- Permissions to service tasks of type "expert" within MelodyArc
- Ideally, a basic understanding of JavaScript and HTTP requests
### New to MelodyArc?
To get started with MelodyArc, reach out to book a demo.
Setup
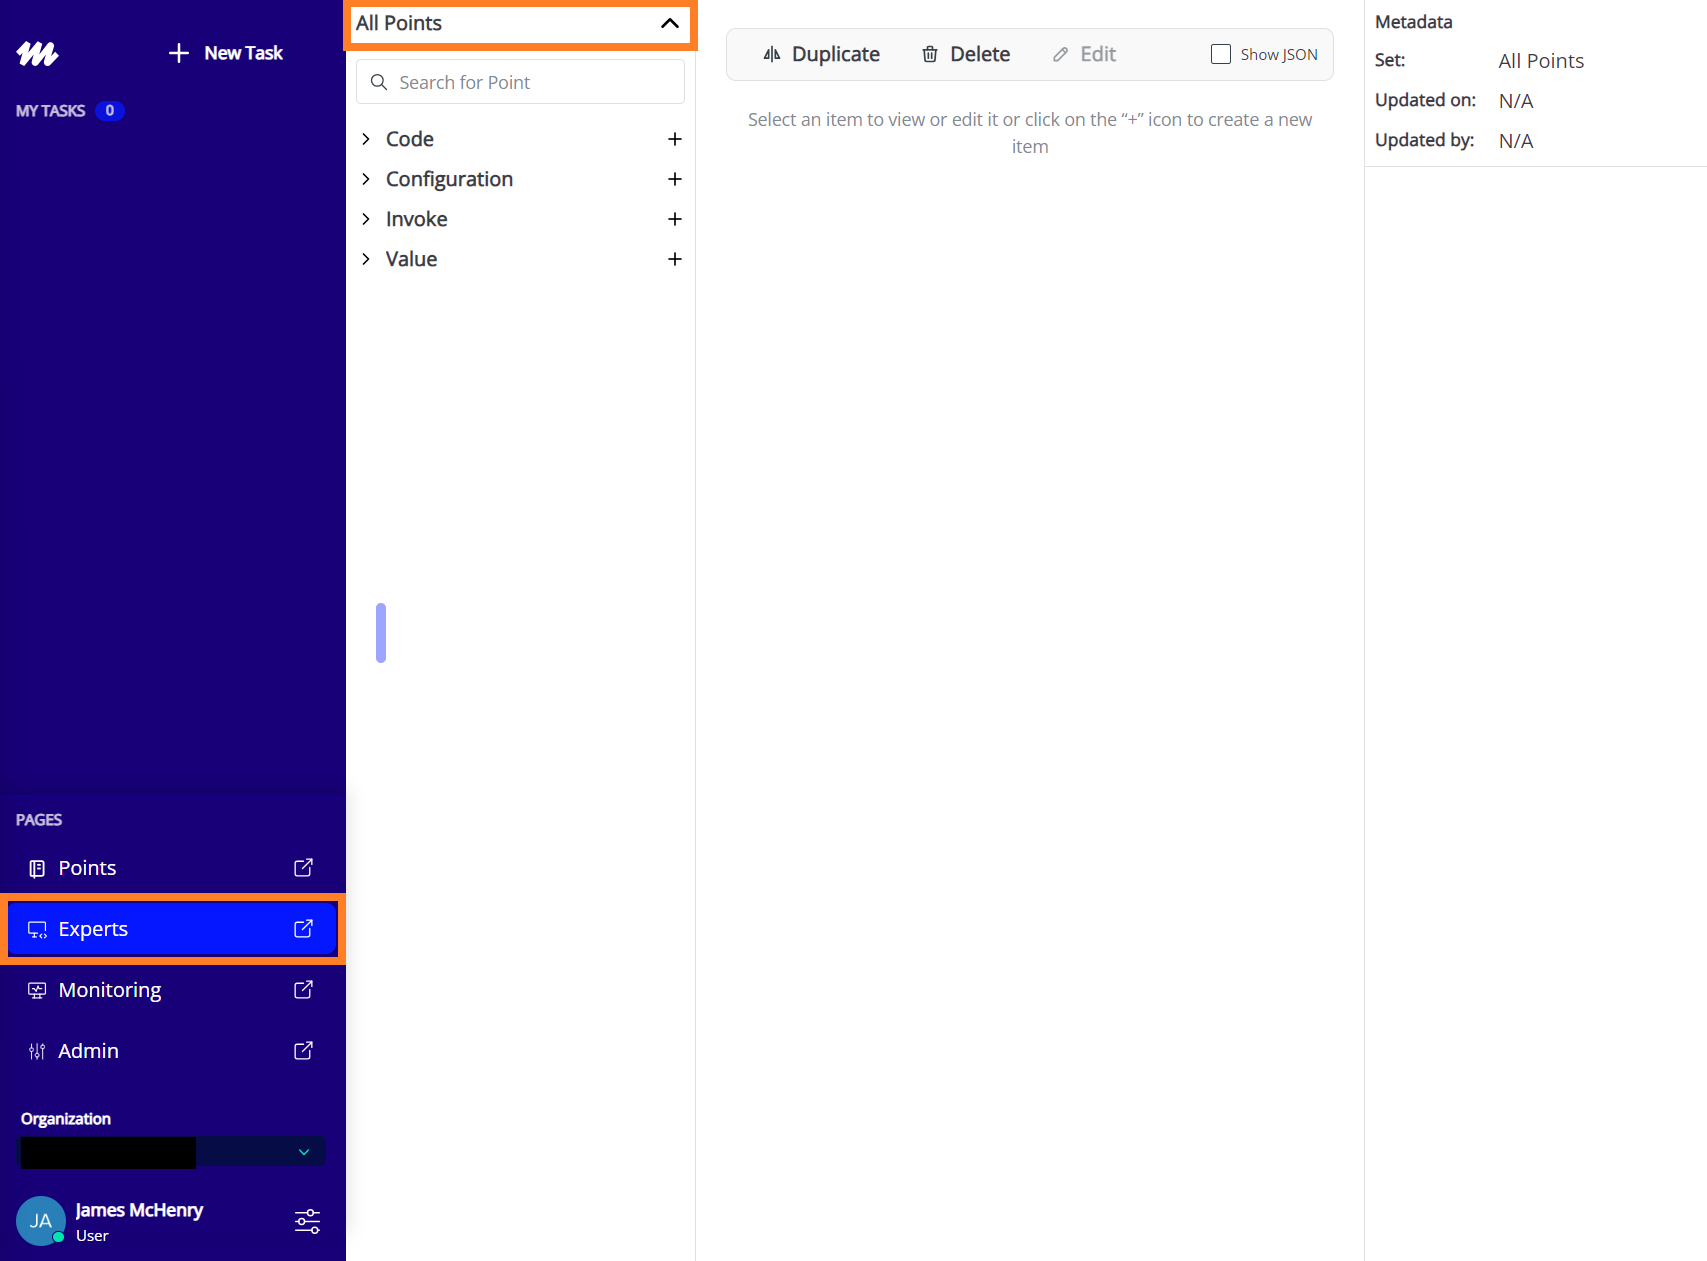
This tutorial will use the experts page within the MelodyArc Portal and a few Platform APIs.
On the experts page, ensure "All Points" is selected as the point set.
Create Configuration
When the MelodyArc Platform receives a task, it checks if a configuration can be applied. The configuration is applied if its inputs are triggered by undirected fill.
We will create a configuration that activates when a task has a value of customer_service in the data token path of task.intent. Configurations orchestrate how tasks are serviced by segmenting points based on flows. These flows define which points can be evaluated by undirected fill based on their belonging to one or more groupings called "partitions".
Steps
Click the + next to "Configuration" to create a new configuration. Enter the following required information:
Optional informationPoints and configurations have required and optional properties. If a property is not mentioned in this tutorial, assume you can leave it blank.
Metadata
- Name:
first_service_tutorial
Inputs
We will define one input.
- Path:
task.intent - Operator:
equals - Value:
customer_service
Tags
- MelodyArc Tags:
service_tutorial
Flows
We will make six flows.
Flow 1
- Name:
Get context - Partitions:
context
Flow 2
- Name:
Prepare context - Partitions:
prepare_context
Flow 3
- Name:
Prepare service - Partitions:
prepare_service
Flow 4
- Name:
Service - Partitions:
service
Flow 5
- Name:
Response - Partitions:
response
Flow 6
- Name:
Debug - Partitions:
debug
Confirm Creation
Select Yes and click Submit
### Create with JSON
Alternatively, creation can also be achieved by selecting the "Show JSON" box on the top toolbar. Then, paste the following content and update the organization_id.
JSON
```json
\{
  "organization_id": "<replace_organization_id>",
  "name": "first_service_tutorial",
  "partition": "",
  "description": "",
  "tags": [
    "service_tutorial"
  ],
  "when": [
    \{
      "task.intent": \{
        "evaluate": "=customer_service"
      \}
    \}
  ],
  "flows": [
    \{
      "action": "undirected_fill",
      "details": \{
        "name": "Get context",
        "partitions": [
          "context"
        ],
        "components": "enabled",
        "repeatable": false,
        "allow_additional_outputs": true,
        "on_multiple_points": "sequential",
        "on_no_points": "error",
        "max_points": 20
      \}
    \},
    \{
      "action": "undirected_fill",
      "details": \{
        "name": "Prepare context",
        "partitions": [
          "prepare_context"
        ],
        "components": "enabled",
        "repeatable": false,
        "allow_additional_outputs": true,
        "on_multiple_points": "sequential",
        "on_no_points": "error",
        "max_points": 20
      \}
    \},
    \{
      "action": "undirected_fill",
      "details": \{
        "name": "Prepare service",
        "partitions": [
          "prepare_service"
        ],
        "components": "enabled",
        "repeatable": false,
        "allow_additional_outputs": true,
        "on_multiple_points": "sequential",
        "on_no_points": "error",
        "max_points": 20
      \}
    \},
    \{
      "action": "undirected_fill",
      "details": \{
        "name": "Service",
        "partitions": [
          "service"
        ],
        "components": "enabled",
        "repeatable": false,
        "allow_additional_outputs": true,
        "on_multiple_points": "sequential",
        "on_no_points": "error",
        "max_points": 20
      \}
    \},
    \{
      "action": "undirected_fill",
      "details": \{
        "name": "Response",
        "partitions": [
          "response"
        ],
        "components": "enabled",
        "repeatable": false,
        "allow_additional_outputs": true,
        "on_multiple_points": "sequential",
        "on_no_points": "error",
        "max_points": 20
      \}
    \},
    \{
      "action": "undirected_fill",
      "details": \{
        "name": "Debug",
        "partitions": [
          "debug"
        ],
        "components": "enabled",
        "repeatable": false,
        "allow_additional_outputs": true,
        "on_multiple_points": "sequential",
        "on_no_points": "error",
        "max_points": 20
      \}
    \}
  ],
  "search_resource_type": "configuration"
\}
```
Prevent Task Closing
First, we will prepare for debugging by creating an invoke point that prevents our test task from closing. This invoke will call a code point that is available by default.
Create Invoke Point
On the experts page, click the + next to "Invoke" to create a new invoke point. Enter the following required information:
Metadata
- Name:
tutorial_prevent_close - Partition:
debug
Inputs
We will define one input.
Input 1
- Path:
task.intent - Operator:
equals - Value:
customer_service - Description:
Task is for customer service demo
Tags
- MelodyArc Tags:
service_tutorial
Attributes
We will define three attributes.
Attribute 1
- Key:
friendly_name - Value:
Prevent Task from Closing
Attribute 2
- Key:
invoke_pages - Value:
[
  {
    "header": "Debug - Prevent Task Close",
    "instructions": "",
    "fields": [
      {
        "id": "debug",
        "title": "Prevent Task Close",
        "acknowledge": false,
        "component": "markdown_display",
        "instructions": "",
        "default_value": "This component is intended for debugging. It is placed to prevent a task from completing.",
        "required": false,
        "size": "auto"
      }
    ]
  }
]
Attribute 3
- Key:
invoke_data_token - Value:
{}(Ensure JSON radio button selected)
Code
- Code:
invoke_component
Confirm Creation
Select Yes and click Submit.
### Create with JSON
Alternatively, creation can also be achieved by selecting the "Show JSON" box on the top toolbar. Then, paste the following content and update the organization_id.
JSON
```json
\{
  "organization_id": "<replace_organization_id>",
  "name": "tutorial_prevent_close",
  "partition": "debug",
  "description": "",
  "tags": [
    "service_tutorial"
  ],
  "inputs": \{
    "task.intent": \{
      "evaluate": "=customer_service",
      "description": "Task is for customer service demo"
    \}
  \},
  "attributes": \{
    "friendly_name": "Prevent Close",
    "description": "Prevent task from closing",
    "instructions": "Prevent task from closing",
    "response": null,
    "invoke_pages": [
      \{
        "header": "Debug - Prevent Task Close",
        "instructions": "",
        "fields": [
          \{
            "id": "debug",
            "title": "Prevent Task Close",
            "acknowledge": false,
            "component": "markdown_display",
            "instructions": "",
            "default_value": "This component is intended for debugging. It is placed to prevent a task from completing.",
            "required": false,
            "size": "auto"
          \}
        ]
      \}
    ],
    "invoke_data_token": \{\}
  \},
  "code": "invoke_component",
  "search_resource_type": "invoke"
\}
```
Preventing a task from closingPreventing a task from closing prevents it from completing. In production, this can add unintended behaviors. Preventing close should only be used for configuration or testing.
Send Task
We will now create a point that will send a task to the MelodyArc platform via a webhook. In the request, we will include information to trigger the configuration and simulate a service request. The simulated service request will contain information about a customer and a message describing their request
Create Invoke Point
On the experts page, click the + next to "Invoke" to create a new invoke point. Enter the following required information:
Metadata
- Name:
create_tutorial_service_task - Partition:
taskless
Inputs
We will define one input.
Input 1
- Path:
task.intent - Operator:
equals - Value:
customer_service - Description:
Task is for customer service demo
Tags
- MelodyArc Tags:
service_tutorial
Attributes
We will define five attributes.
Attribute 1
- Key:
friendly_name - Value:
Create Tutorial Task
Attribute 2
- Key:
description - Value:
Service tutorial task
Attribute 3
- Key:
task_type - Value:
expert
Attribute 4
- Key:
id_name - Value:
tutorial
Attribute 5
- Key:
data - Value:
{
  "task": {
    "intent": "customer_service",
    "type": "expert",
    "action": "create"
  },
  "customer": {
    "email": "[email protected]",
    "message": "Hi,\n\nI think I accidentally ordered 5 of the Colombo bed. Meant to only order 1. Can you confirm if I did that?\n\nLiam"
  }
}
Options
Toggle onAllow Taskless and Is Quicklink
Code
- Code:
taskless_webhook_assign
Confirm Creation
Select Yes and click Submit.
### Create with JSON
Alternatively, creation can also be achieved by selecting the "Show JSON" box on the top toolbar. Then, paste the following content and update the organization_id.
JSON
```json
 \{
  "organization_id": "<replace_organization_id>",
  "name": "create_tutorial_service_task",
  "partition": "taskless",
  "description": "Task for service tutorial",
  "tags": [
    "service_tutorial"
  ],
  "inputs": \{
    "task.intent": \{
      "evaluate": "=customer_service"
    \}
  \},
  "attributes": \{
    "friendly_name": "Create Tutorial Task ",
    "description": "Service tutorial task",
    "task_type": "expert",
    "id_name": "tutorial",
    "data": \{
      "task": \{
        "intent": "customer_service",
        "type": "expert",
        "action": "create"
      \},
      "customer": \{
        "email": "[email protected]",
        "message": "Hi,\n\nI think I accidentally ordered 5 of the Colombo bed. Meant to only order 1. Can you confirm if I did that?\n\nLiam"
      \}
    \}
  \},
  "code": "taskless_webhook_assign",
  "allow_taskless": true,
  "is_quicklink": true,
  "search_resource_type": "invoke"
\}
```
Send the webhook
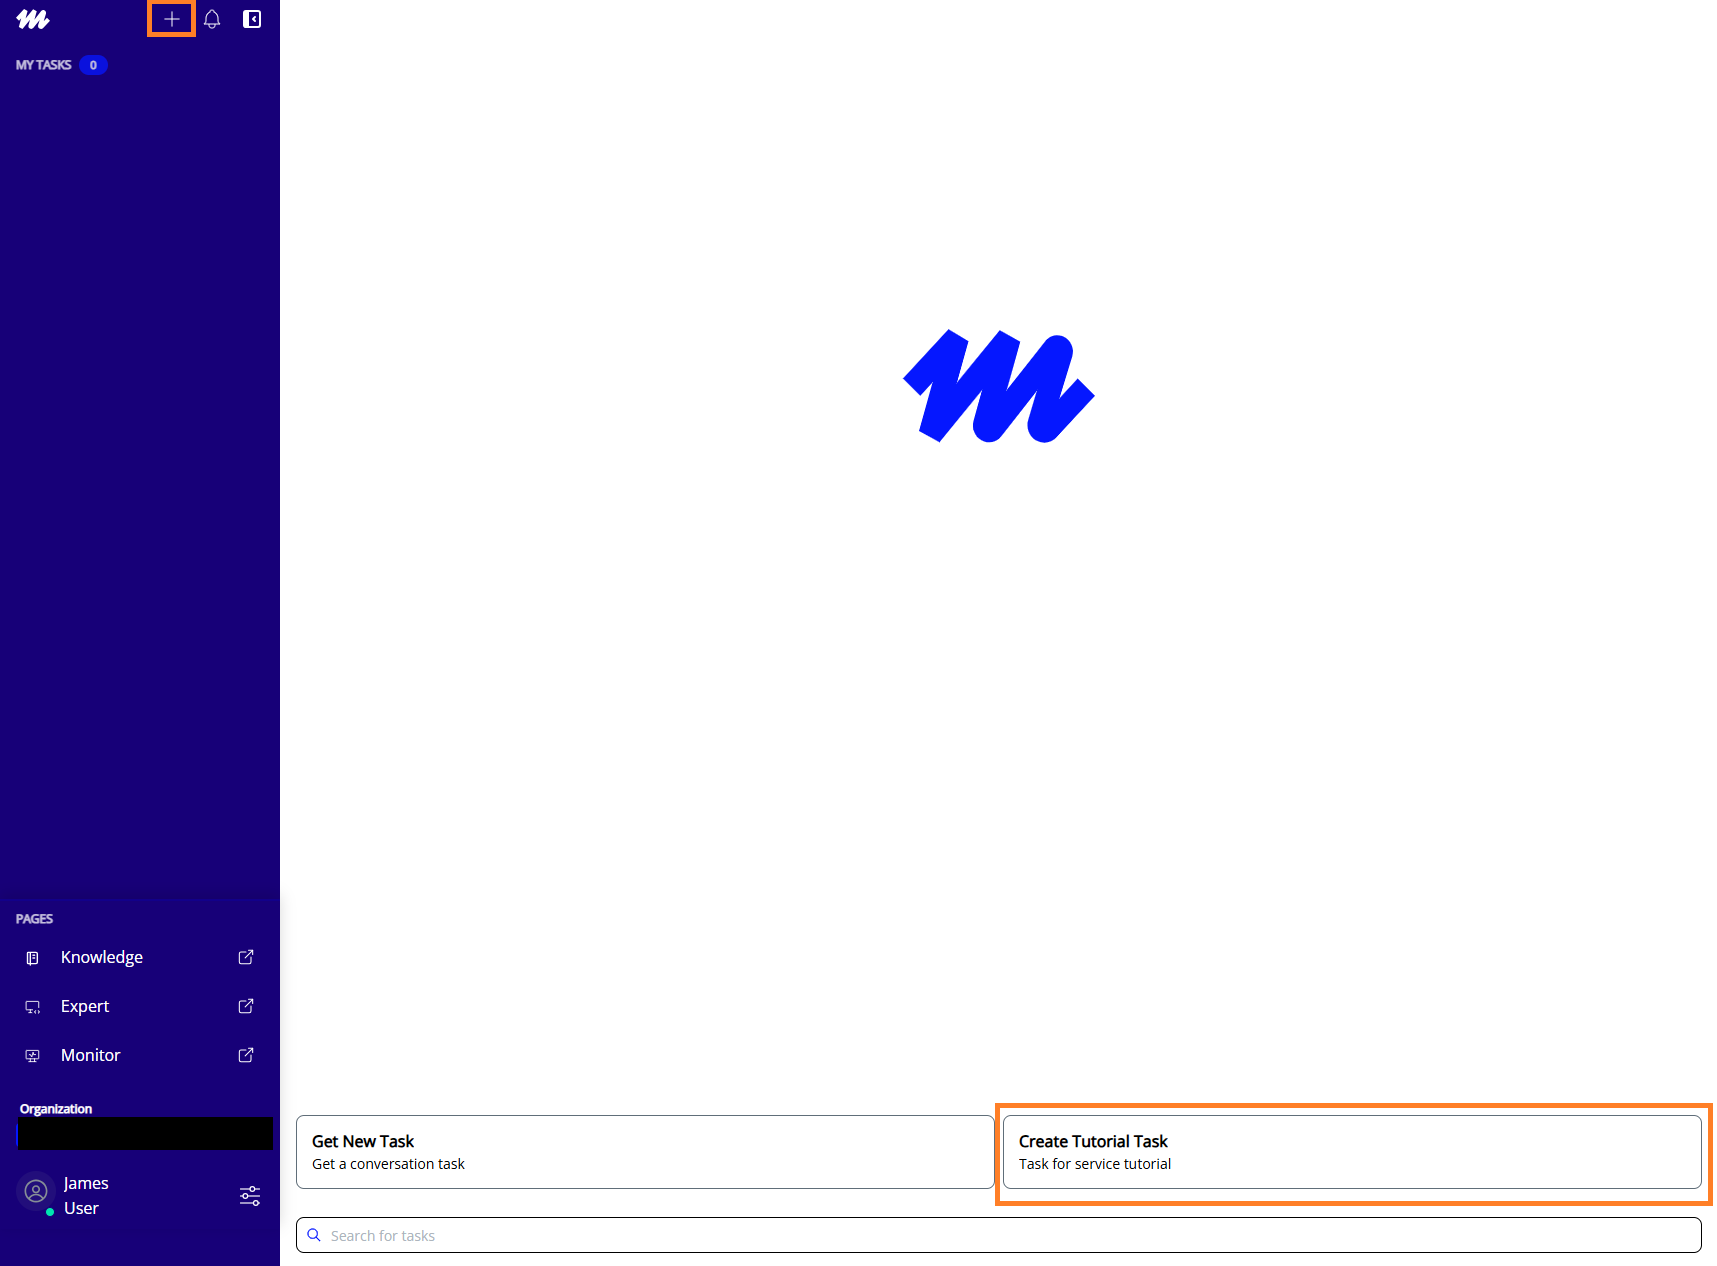
Go back to homepage by clicking the + in the top of the left menu. You should now see an option for "Create Tutorial Task" in the bottom right. Click that to send the task.
Open the Task
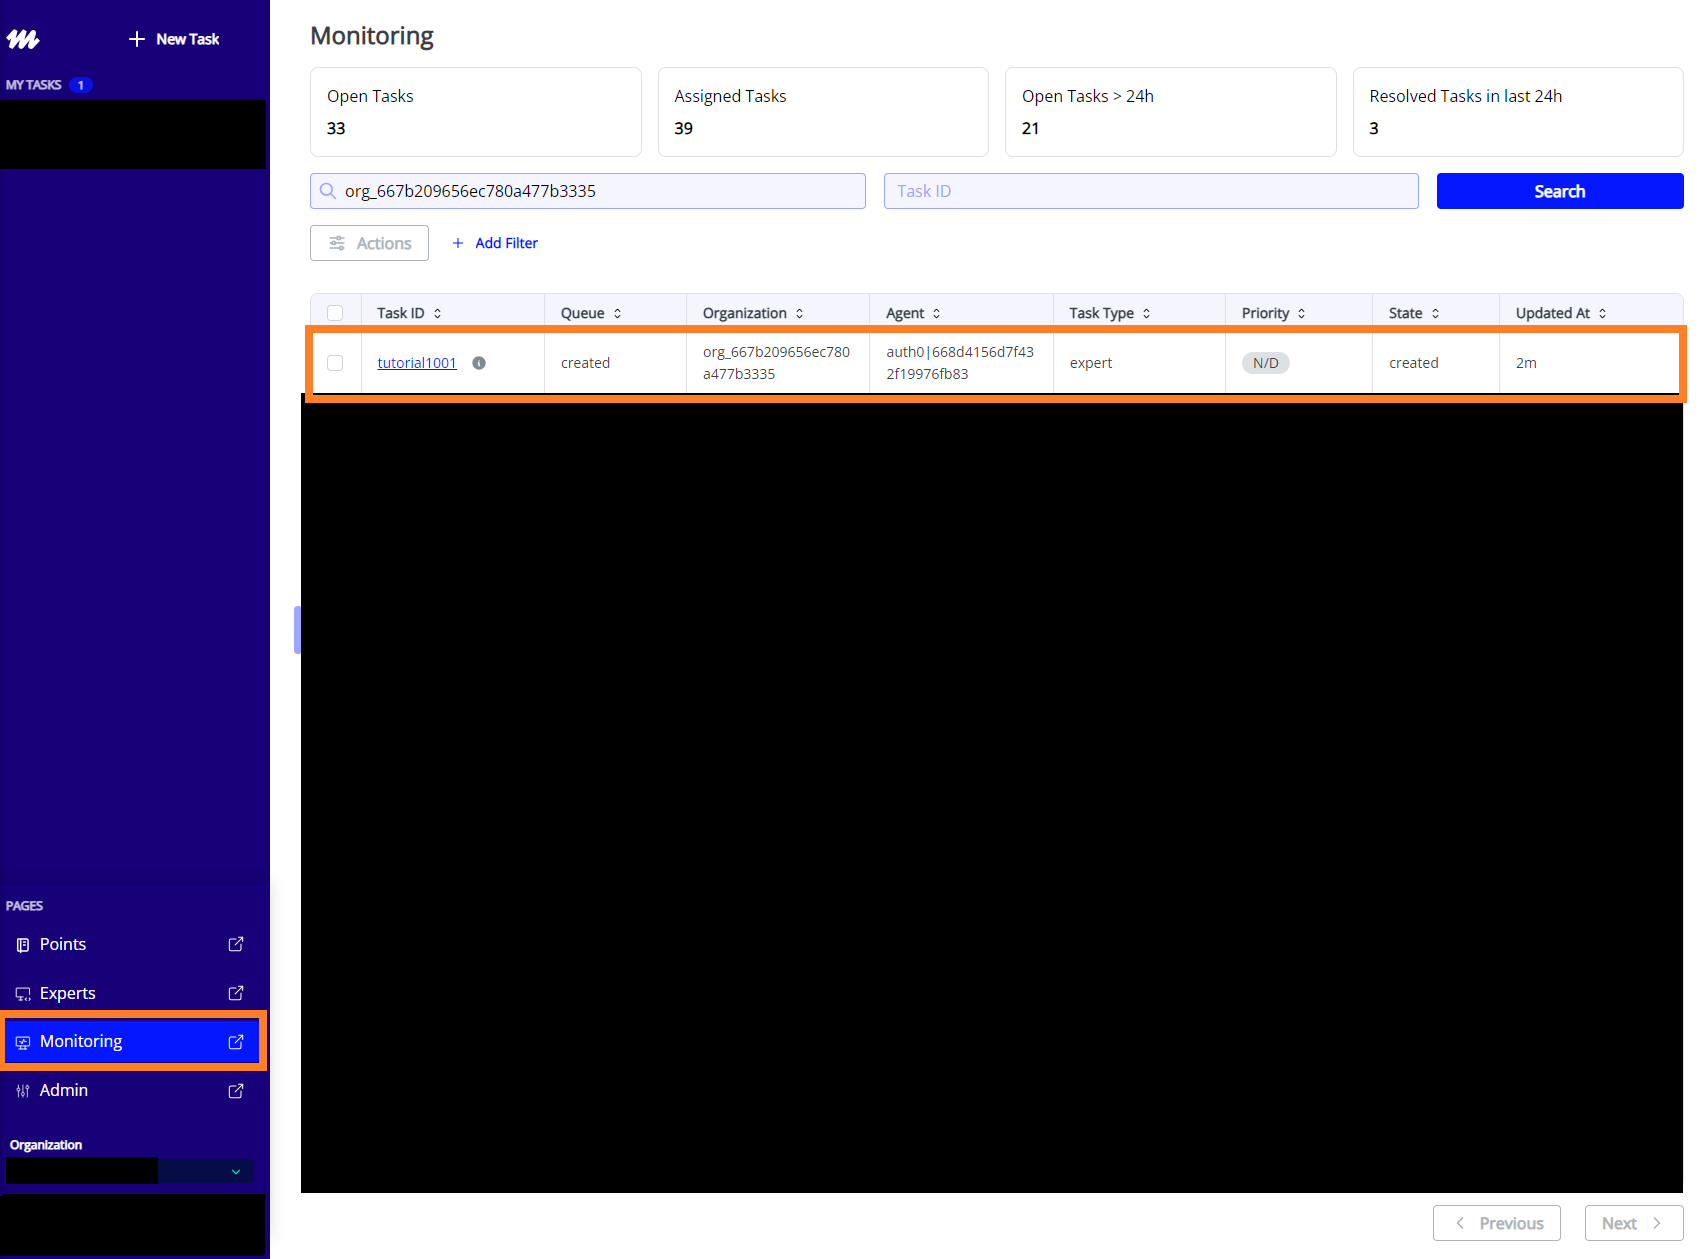
After a few seconds the "Prevent Close" form should appear and a task will appear in "My Tasks".
Go to the "Monitoring" page. If your configuration was done successfully, you will see the task you created. Click on the task id to open.
We will use the MelodyArc Portal to view the token of this task. You can view the tokens by opening the "Tools" panel located in the top right.
### **No points or components**
While a configuration was successfully activated for this task, we have not yet configured points to activate.
Retrieve Customer Information
We will now begin servicing the task. For this demo, we are using mock data from DummyJSON.
First, we will retrieve the customers information based on their email. To do this we will write a code point, to retrieve the order via an API call, and a corresponding invoke point to trigger this code point via undirected fill based on data received in the task.
Create Code Point
On the experts page, click the + next to "Code" to create a new code point. Enter the following required information:
Metadata
- Name:
tutorial_get_customer - Partition:
context
Tags
- MelodyArc Tags:
service_tutorial
Code
- Code: Enter the below:
const email = _token.customer.email ?? "";
async function execute_process() {
    try {
        const res = await fetch(`https://dummyjson.com/users/filter?key=email&value=${email}`);
        const response = await res.json();
        return {
            "customer.user": response.users[0]
        };
    } catch (error) {
        return {
            "customer.user": "API failure"
        };
    }
};
Confirm Creation
Select Yes and click Submit
### Create with JSON
Alternatively, creation can also be achieved by selecting the "Show JSON" box on the top toolbar. Then, paste the following content and update the organization_id.
JSON
```json
\{
  "organization_id": "<replace_organization_id>",
  "name": "tutorial_get_customer",
  "partition": "context",
  "description": "",
  "tags": [
    "service_tutorial"
  ],
  "code": "const email = _token.customer.email ?? \"\";\nasync function execute_process() \{\n    try \{\n        const res = await fetch(`https://dummyjson.com/users/filter?key=email&value=${email}`);\n        const response = await res.json();\n        return \{\n            \"customer.user\": response.users[0]\n        \};\n    \} catch (error) \{\n        return \{\n            \"customer.user\": \"API failure\"\n        \};\n    \}\n\};",
  "imports": [],
  "parameters": [],
  "language": "JavaScript",
  "version": "latest",
  "search_resource_type": "code"
\}
```
Create Invoke Point
On the experts page, click the + next to "Invoke" to create a new invoke point. Enter the following required information:
Metadata
- Name:
tutorial_get_customer - Partition:
context
Inputs
We will define two inputs.
Input 1
- Path:
task.intent - Operator:
equals - Value:
customer_service - Description:
Task is for customer service demo
Input 2
- Path:
customer.email - Operator:
exists - Description:
Customer email is present
Tags
- MelodyArc Tags:
service_tutorial
Attributes
We will define one attribute.
Attribute 1
- Key:
friendly_name - Value:
Tutorial - Get Customer
Code
- Code:
tutorial_get_customer
Confirm Creation
Select Yes and click Submit
### Create with JSON
Alternatively, creation can also be achieved by selecting the "Show JSON" box on the top toolbar. Then, paste the following content and update the organization_id.
JSON
```json
\{
  "organization_id": "<replace_organization_id>",
  "name": "tutorial_get_customer",
  "partition": "context",
  "description": "",
  "tags": [
    "service_tutorial"
  ],
  "inputs": \{
    "task.intent": \{
      "evaluate": "=customer_service",
      "description": "Task is for customer service demo"
    \},
    "customer.email": \{
      "evaluate": true,
      "description": "Customer email is present"
    \}
  \},
  "attributes": \{
    "friendly_name": "Tutorial - Get Customer",
    "description": null,
    "instructions": null,
    "response": null
  \},
  "code": "tutorial_get_customer",
  "search_resource_type": "invoke"
\}
```
Testing
Test your flow after each step. To test, select the task on the monitoring page and choose restart from the actions.
Return to task once restarted and see if expected values have been written to the data token.
Undirected fill logsThe "Tool" panel, on the top right of the task screen, contains logs for undirected fill within the "Points" tab.
Retrieve Orders
Next, we will augment our context by bringing in the customer's orders based on their user id.
Create Code Point
On the experts page, click the + next to "Code" to create a new code point. Enter the following required information:
Metadata
- Name:
tutorial_get_orders - Partition:
context
Tags
- MelodyArc Tags:
service_tutorial
Code
- Code: Enter the below:
// get user id from token
const user_id = _token.customer.user.id ?? "";
async function execute_process() {
    try {
        const res = await fetch(`https://dummyjson.com/carts/user/${user_id}`);
        const response = await res.json();
        return {
            "orders": response.carts[0]
        };
    } catch (error) {
        return {
            "orders": "API failure"
        };
    }
    };
Confirm Creation
Select Yes and click Submit
### Create with JSON
Alternatively, creation can also be achieved by selecting the "Show JSON" box on the top toolbar. Then, paste the following content and update the organization_id.
JSON
```json
\{
  "organization_id": "<replace_organization_id>",
  "name": "tutorial_get_orders",
  "partition": "context",
  "description": "",
  "tags": [
    "service_tutorial"
  ],
  "code": "// get user id from token\nconst user_id = _token.customer.user.id ?? \"\";\nasync function execute_process() \{\n    try \{\n        const res = await fetch(`https://dummyjson.com/carts/user/${user_id}`);\n        const response = await res.json();\n        return \{\n            \"orders\": response.carts[0]\n        \};\n    \} catch (error) \{\n        return \{\n            \"orders\": \"API failure\"\n        \};\n    \}\n    \};",
  "imports": [],
  "parameters": [],
  "language": "JavaScript",
  "version": "latest",
  "search_resource_type": "code"
\}
```
Create Invoke Point
On the experts page, click the + next to "Invoke" to create a new invoke point. Enter the following required information:
Metadata
- Name:
tutorial_get_orders - Partition:
context
Inputs
We will define two inputs.
Input 1
- Path:
task.intent - Operator:
equals - Value:
customer_service - Description:
Task is for customer service demo
Input 2
- Path:
customer.user.id - Operator:
exists - Description:
Customer user id exists
Tags
- MelodyArc Tags:
service_tutorial
Attributes
We will define one attribute.
Attribute 1
- Key:
friendly_name - Value:
Tutorial - Get Orders
Code
- Code:
tutorial_get_orders
Confirm Creation
Select Yes and click Submit
### Create with JSON
Alternatively, creation can also be achieved by selecting the "Show JSON" box on the top toolbar. Then, paste the following content and update the organization_id.
JSON
```json
\{
  "organization_id": "<replace_organization_id>",
  "name": "tutorial_get_orders",
  "partition": "context",
  "description": "",
  "tags": [
    "service_tutorial"
  ],
  "inputs": \{
    "task.intent": \{
      "evaluate": "=customer_service",
      "description": "Task is for customer service demo"
    \},
    "customer.user.id": \{
      "evaluate": true,
      "description": "Customer user id exists"
    \}
  \},
  "attributes": \{
    "friendly_name": "Tutorial - Get Orders"
  \},
  "code": "tutorial_get_orders",
  "search_resource_type": "invoke"
\}
```
Prepare Context
Now that we have the customers data we are going to prepare it for agents. To do this we will configure a set of code and invoke points that create an order history view in markdown.
Create Code Point
On the experts page, click the + next to "Code" to create a new code point. Enter the following required information:
Metadata
- Name:
tutorial_create_order_history - Partition:
prepare_context
Tags
- MelodyArc Tags:
service_tutorial
Code
- Code: Enter the below:
// Function to convert order details to markdown format
const createOrderHistory = (json) => {
let markdown = `# Order Details\n\n`;
markdown += `**Order ID:** ${json.id ?? 'N/A'}\n\n`;
markdown += `**User ID:** ${json.userId ?? 'N/A'}\n\n`;
markdown += `**Total Products:** ${json.totalProducts ?? 'N/A'}\n\n`;
markdown += `**Total Quantity:** ${json.totalQuantity ?? 'N/A'}\n\n`;
markdown += `**Total Price:** $${(json.total ?? 0).toFixed(2)}\n\n`;
markdown += `**Total Discounted Price:** $${(json.discountedTotal ?? 0).toFixed(2)}\n\n`;
markdown += `## Products\n\n`;
(json.products ?? []).forEach((product) => {
markdown += `### ${product.title ?? 'No title'}\n\n`;
markdown += `\n\n`;
markdown += `- **Product ID:** ${product.id ?? 'N/A'}\n`;
markdown += `- **Price:** $${(product.price ?? 0).toFixed(2)}\n`;
markdown += `- **Quantity:** ${product.quantity ?? 'N/A'}\n`;
markdown += `- **Total:** $${(product.total ?? 0).toFixed(2)}\n`;
markdown += `- **Discount Percentage:** ${product.discountPercentage ?? 0}%\n`;
markdown += `- **Discounted Total:** $${(product.discountedTotal ?? 0).toFixed(2)}\n\n`;
});
return markdown;
};
// Orders object from the token
const orders = _token.orders ?? {};
async function execute_process() {
// Create order history markdown
const order_history = createOrderHistory(orders);
return {
"reference.order_history": order_history
};
};Confirm Creation
Select Yes and click Submit
### Create with JSON
Alternatively, creation can also be achieved by selecting the "Show JSON" box on the top toolbar. Then, paste the following content and update the organization_id.
JSON
```json
\{
"organization_id": "<replace_organization_id>",
"name": "tutorial_create_order_history",
"partition": "prepare_context",
"description": "",
"tags": [
"service_tutorial"
],
"code": "// Function to convert order details to markdown format\nconst createOrderHistory = (json) => \{\n let markdown = `# Order Details\\n\\n`;\n\n markdown += `**Order ID:** ${json.id ?? 'N/A'}\\n\\n`;\n markdown += `**User ID:** ${json.userId ?? 'N/A'}\\n\\n`;\n markdown += `**Total Products:** ${json.totalProducts ?? 'N/A'}\\n\\n`;\n markdown += `**Total Quantity:** ${json.totalQuantity ?? 'N/A'}\\n\\n`;\n markdown += `**Total Price:** $${(json.total ?? 0).toFixed(2)}\\n\\n`;\n markdown += `**Total Discounted Price:** $${(json.discountedTotal ?? 0).toFixed(2)}\\n\\n`;\n\n markdown += `## Products\\n\\n`;\n\n (json.products ?? []).forEach((product) => \{\n markdown += `### ${product.title ?? 'No title'}\\n\\n`;\n markdown += `\\n\\n`;\n markdown += `- **Product ID:** ${product.id ?? 'N/A'}\\n`;\n markdown += `- **Price:** $${(product.price ?? 0).toFixed(2)}\\n`;\n markdown += `- **Quantity:** ${product.quantity ?? 'N/A'}\\n`;\n markdown += `- **Total:** $${(product.total ?? 0).toFixed(2)}\\n`;\n markdown += `- **Discount Percentage:** ${product.discountPercentage ?? 0}%\\n`;\n markdown += `- **Discounted Total:** $${(product.discountedTotal ?? 0).toFixed(2)}\\n\\n`;\n \});\n\n return markdown;\n\};\n\n// Orders object from the token\nconst orders = _token.orders ?? \{\};\n\nasync function execute_process() \{\n // Create order history markdown\n const order_history = createOrderHistory(orders);\n\n return \{\n \"reference.order_history\": order_history\n \};\n\};",
"imports": [],
"parameters": [],
"language": "JavaScript",
"version": "latest",
"search_resource_type": "code"
\}
```Create Invoke Point
On the experts page, click the + next to "Invoke" to create a new invoke point. Enter the following required information:
Metadata
- Name:
tutorial_create_order_history - Partition:
prepare_context
Inputs
We will define two inputs.
Input 1
- Path:
task.intent - Operator:
equals - Value:
customer_service - Description:
Task is for customer service demo
Input 2
- Path:
orders.id - Operator:
exists - Description:
Orders exist
Tags
- MelodyArc Tags:
service_tutorial
Attributes
We will define one attribute.
Attribute 1
- Key:
friendly_name - Value:
Tutorial - Create Order History
Code
- Code:
tutorial_create_order_history
Confirm Creation
Select Yes and click Submit
### Create with JSON
Alternatively, creation can also be achieved by selecting the "Show JSON" box on the top toolbar. Then, paste the following content and update the organization_id.
JSON
```json
\{
  "organization_id": "<replace_organization_id>",
  "name": "tutorial_create_order_history",
  "partition": "prepare_context",
  "description": "",
  "tags": [
    "service_tutorial"
  ],
  "inputs": \{
    "task.intent": \{
      "evaluate": "=customer_service",
      "description": "Task is for customer service demo"
    \},
    "orders.id": \{
      "evaluate": true,
      "description": "Orders exist"
    \}
  \},
  "attributes": \{
    "friendly_name": "Tutorial - Create Order History"
  \},
  "code": "tutorial_create_order_history",
  "search_resource_type": "invoke"
\}
```
Create Response Template
We will create a template, often called a blurb, for how the response to the customer should look. We will house this blurb in a value point.
Create Value Point
On the experts page, click the + next to "Value" to create a new value point. Enter the following required information:
Metadata
- Name:
tutorial_response_template - Friendly Name:
Tutorial - Response Template - Partition:
service_tutorial
Inputs
This value will have no inputs. Delete blank inputs to proceed.
Tags
- MelodyArc Tags:
service_tutorial
Value
Select String
- Value: Enter the below:
"Hi [Customer Name], \n\n [Message goes here] \n\n Let us know if we can help with anything else, \n\n Customer Service"Confirm Creation
Select Yes and click Submit
### Create with JSON
Alternatively, creation can also be achieved by selecting the "Show JSON" box on the top toolbar. Then, paste the following content and update the organization_id.
JSON
```json
\{
  "organization_id": "<replace_organization_id>",
  "name": "tutorial_response_template",
  "partition": "service_tutorial",
  "description": "",
  "tags": [
    "service_tutorial"
  ],
  "value": "\"Hi [Customer Name],  \\n\\n [Message goes here]  \\n\\n Let us know if we can help with anything else, \\n\\n Customer Service\"",
  "search_resource_type": "value"
\}
```
Create Entities
We are ready to service the task. We will create an entity to run the service points. Entities enable points to run multiple times across different context. Each task type has a defined key which houses entities. For us, the key is selection. We will create a set of code and invoke points to set values in the entity key.
### Why use an entity?
We are using an entity in this tutorial to demonstrate how to create entities and activate points within one. An entity is not actually needed for the tutorial use case. In production, entities are widely used to allow branches of service to occur across elements in the entity array.
Create Code Point
On the experts page, click the + next to "Code" to create a new code point. Enter the following required information:
Metadata
- Name:
tutorial_create_service_entities - Partition:
service
Tags
- MelodyArc Tags:
service_tutorial
Code
- Code: Enter the below:
async function execute_process() {
    const entityPath = _token._entity?.type || "selection";
    const updated = {
        type: "service",
        id: _token.customer?.user?.id || "none",
    };

    return {
        [entityPath]: [...(_token[entityPath] || []), updated]
    };
}
Confirm Creation
Select Yes and click Submit
### Create with JSON
Alternatively, creation can also be achieved by selecting the "Show JSON" box on the top toolbar. Then, paste the following content and update the organization_id.
JSON
```json

\{
  "organization_id": "<replace_organization_id>",
  "name": "tutorial_create_service_entities",
  "partition": "service",
  "description": "",
  "tags": [
    "service_tutorial"
  ],
  "code": "async function execute_process() \{\n    const entityPath = _token._entity?.type || \"selection\";\n    const updated = \{\n        type: \"service\",\n        id: _token.customer?.user?.id || \"none\",\n    \};\n\n    return \{\n        [entityPath]: [...(_token[entityPath] || []), updated]\n    \};\n\}",
  "imports": [],
  "parameters": [],
  "language": "JavaScript",
  "version": "latest",
  "search_resource_type": "code"
\}
```
Create Invoke Point
On the experts page, click the + next to "Invoke" to create a new invoke point. Enter the following required information:
Metadata
- Name:
tutorial_create_service_entities - Partition:
service
Inputs
We will define two inputs.
Input 1
- Path:
task.intent - Operator:
equals - Value:
customer_service - Description:
Task is for customer service demo
Input 2
- Path:
orders.id - Operator:
exists - Description:
Orders exist
Tags
- MelodyArc Tags:
service_tutorial
Attributes
We will define one attribute.
Attribute 1
- Key:
friendly_name - Value:
Tutorial - Create Service Entities
Code
- Code:
tutorial_create_service_entities
Confirm Creation
Select Yes and click Submit
### Create with JSON
Alternatively, creation can also be achieved by selecting the "Show JSON" box on the top toolbar. Then, paste the following content and update the organization_id.
JSON
```json
\{
  "organization_id": "<replace_organization_id>",
  "name": "tutorial_create_service_entities",
  "partition": "service",
  "description": "",
  "tags": [
    "service_tutorial"
  ],
  "inputs": \{
    "task.intent": \{
      "evaluate": "=customer_service",
      "description": "Task is for customer service demo"
    \},
    "orders.id": \{
      "evaluate": true,
      "description": "Orders exist"
    \}
  \},
  "attributes": \{
    "friendly_name": "Tutorial - Create Service Entities"
  \},
  "code": "tutorial_create_service_entities",
  "search_resource_type": "invoke"
\}
```
Create Procedure
We will run AI instructions to service this task.
Create Invoke Point
On the experts page, click the + next to "Invoke" to create a new invoke point. Enter the following required information:
Metadata
- Name:
tutorial_service_customer_procedure - Partition:
service
Inputs
We will define two inputs.
Input 1
- Path:
task.intent - Operator:
equals - Value:
customer_service - Description:
Task is for customer service demo
Input 2
- Path:
_this.type - Operator:
equals - Value:
service - Description:
Entity type is service
Path with_this
_thisis used to activate points in entities. Any invoke that has one or more paths with_thiswill activate in an entity. More information can be found here.
Tags
- MelodyArc Tags:
service_tutorial
Attributes
We will define three attributes.
Attribute 1
- Key:
friendly_name - Value:
Tutorial - Service Customer
Attribute 2
- Key:
prompt - Value: Select
Markdownand enter the below
You are an expert Customer Service Agent.

# Purpose
Create a response to the customer's request.

# Instructions
> [!NOTE]
> 🤖😀 Steps to be followed by AI and human Agents

## Step 1 - Review Customer Information
- Name: `[[customer.user.firstName]] [[customer.user.lastName]]`

## Step 2 - Read Customer Message

<details><summary>Message</summary>

`[[customer.message]]`

</details>

## Step 3 - Review Order History

<details><summary>Order History</summary>

`[[reference.order_history?{}]]`

</details>

## Step 4 - Write a Response to the Customer

Write a concise response to the customer's message.

Use the following template as a guide, replacing anything enclosed in brackets. Use GitHub Markdown to format line breaks.

### Response Template
`[[ @tutorial_response_template ]]`

## Step 5 - Apply Overrides
If present, apply instruction overrides found in Appendix.

# Appendix
## Instruction Overrides
Alter instructions with any feedback provided here:
Fill textThe instructions use fill text to dynamically populate text from the data token and value points. Note we utilize the value point we created earlier.
Attribute 3
- Key:
systemPrompt - Value: Enter the below:
You are an expert Customer Service Agent.

### Generate JSON Response
Create a JSON object with a top level key of `_this` with the following element:
- `response`: The response to the customer. Use GitHub markdown to format the response.

#### Example format:
```json
\{
  "_this": \{
    "response": "Hi Jane Doe,\n\nThank you for reaching out about your recent order. We apologize for the inconvenience you've experienced.\n\nOur team has reviewed your order and is currently working to resolve the issue. We appreciate your patience and will follow up shortly with an update.\n\nBest regards,\nCustomer Service Team"
  \}
\}
```
Code
- Code:
run_prompt
Confirm Creation
Select Yes and click Submit
### Create with JSON
Alternatively, creation can also be achieved by selecting the "Show JSON" box on the top toolbar. Then, paste the following content and update the organization_id.
JSON
````json
\{
  "organization_id": "<replace_organization_id>",
  "name": "tutorial_service_customer_procedure",
  "partition": "service",
  "description": "",
  "tags": [
    "service_tutorial"
  ],
  "inputs": \{
    "task.intent": \{
      "evaluate": "=customer_service",
      "description": "Task is for customer service demo"
    \},
    "_this.type": \{
      "evaluate": "=service",
      "description": "Entity type is service"
    \}
  \},
  "attributes": \{
    "friendly_name": "Tutorial - Service Customer",
    "prompt": "You are an expert Customer Service Agent.\n\n# Purpose\nCreate a response to the customer's request.\n\n# Instructions  \n> [!NOTE]  \n> 🤖😀 Steps to be followed by AI and human Agents\n\n## Step 1 - Review Customer Information\n- Name: `[[customer.user.firstName]] [[customer.user.lastName]]`\n\n## Step 2 - Read Customer Message\n\n<details><summary>Message</summary>\n\n`[[customer.message]]`\n\n</details>\n\n## Step 3 - Review Order History\n\n<details><summary>Order History</summary>\n\n`[[reference.order_history?{}]]`\n\n</details>\n\n## Step 4 - Write a Response to the Customer\n\nWrite a concise response to the customer's message.\n\nUse the following template as a guide, replacing anything enclosed in brackets. Use GitHub Markdown to format line breaks.\n\n### Response Template\n`[[ @tutorial_response_template ]]`\n\n## Step 5 - Apply Overrides  \nIf present, apply instruction overrides found in Appendix.\n\n# Appendix\n## Instruction Overrides  \nAlter instructions with any feedback provided here:\n",
    "systemPrompt": "You are an expert Customer Service Agent.\n\n### Generate JSON Response  \nCreate a JSON object with a top level key of `_this` with the following element:\n- `response`: The response to the customer. Use GitHub markdown to format the response.\n\n#### Example format:\n```json\n{\n  \"_this\": {\n    \"response\": \"Hi Jane Doe,\\n\\nThank you for reaching out about your recent order. We apologize for the inconvenience you've experienced.\\n\\nOur team has reviewed your order and is currently working to resolve the issue. We appreciate your patience and will follow up shortly with an update.\\n\\nBest regards,\\nCustomer Service Team\"\n  }\n}\n```\n"
  },
  "code": "run_prompt",
  "search_resource_type": "invoke"
}
````
View Response
Now we will create an invoke that generates a form that displays the response.
Create Invoke Point
On the experts page, click the + next to "Invoke" to create a new invoke point. Enter the following required information:
Metadata
- Name:
tutorial_view_instructions_response - Partition:
service
Inputs
We will define two inputs.
Input 1
- Path:
task.intent - Operator:
equals - Value:
customer_service - Description:
Task is for customer service demo
Input 2
- Path:
_this.response - Operator:
exists - Description:
Response exist
Tags
- MelodyArc Tags:
service_tutorial
Attributes
We will define three attributes.
Attribute 1
- Key:
friendly_name - Value:
Tutorial - View Instructions Response
Attribute 2
- Key:
invoke_pages - Value: Select
JSONand enter the below
[
  \{
    "header": "Response",
    "instructions": "View Response from AI instructions",
    "fields": [
      \{
        "id": "display",
        "title": "Instructions Response",
        "component": "markdown_display",
        "instructions": "",
        "default_value": "[[_this.response]]",
        "size": "auto",
        "max_height": "auto"
      \}
    ]
  \}
]
Attribute 3
- Key:
invoke_data_token - Value: Select
JSONand enter the below
\{\}Code
- Code:
invoke_component
Confirm Creation
Select Yes and click Submit
### Create with JSON
Alternatively, creation can also be achieved by selecting the "Show JSON" box on the top toolbar. Then, paste the following content and update the organization_id.
JSON
```json
{
  "organization_id": "<replace_organization_id>",
  "name": "tutorial_view_instructions_response",
  "partition": "service",
  "description": "",
  "tags": [
    "service_tutorial"
  ],
  "inputs": {
    "task.intent": {
      "evaluate": "=customer_service",
      "description": "Task is for customer service demo"
    },
    "_this.response": {
      "evaluate": true,
      "description": "Response exists"
    }
  },
  "attributes": {
    "friendly_name": "Tutorial - View Instructions Response",
    "invoke_pages": [
      {
        "header": "Response",
        "instructions": "View Response from AI instructions",
        "fields": [
          {
            "id": "display",
            "title": "Instructions Response",
            "component": "markdown_display",
            "instructions": "",
            "default_value": "[[_this.response]]",
            "size": "auto",
            "max_height": "auto"
          }
        ]
      }
    ],
    "invoke_data_token": {}
  },
  "code": "invoke_component",
  "search_resource_type": "invoke"
}
```
You will see the following appear. Click "Submit" to continue.
Create a Key
To simulate sending a response, we will use Webhook Tester. Webhook Tester creates a dynamic endpoint for receiving messages via HTTP calls.
The site will provide a unique webhook URL like: https://webhook-test.com/9f785021d3e66100bf7448230b48f64d
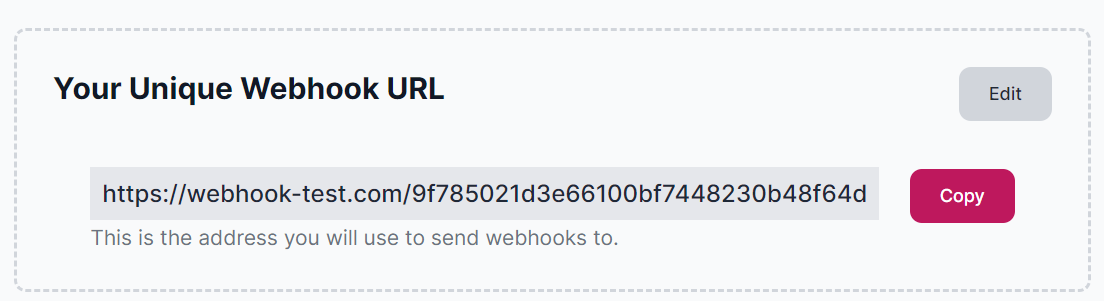
We will store the long string at the end as a key point. Key points are used to store confidential values. While this number is not confidential, we will treat it like it is to learn how to create key points.
Key points can be created via the experts page UX or via API.
Viewing KeysKeys cannot be viewed in the Experts page. You must call via API to view a key outside of a code point.
Create Key Point
On the experts page, click the + next to "Key" to create a new invoke point. Enter the following required information:
Metadata
- Name:
__tutorial_webhook_key - Friendly Name:
Temporary key for service tutorial - Key: The long string, such as
9f785021d3e66100bf7448230b48f64d - Tags:
service_tutorial
Click "Submit" to save.
Send Response
To complete this tutorial we will send the response to the webhook. To do this we will create a code point that uses the key we created as a parameter and a corresponding invoke point.
Create Code Point
On the experts page, click the + next to "Code" to create a new code point. Enter the following required information:
Metadata
- Name:
tutorial_send_response - Partition:
response
Tags
- MelodyArc Tags:
service_tutorial
Attributes
- Parameters: Add
__tutorial_webhook_keyand hit enter. Note that you will need to type in the key name as only value points populate in search.
Code
- Code: Enter the below:
//get key
const key = __tutorial_webhook_key ?? "no_key";

//get response
const payload = _this.response ?? "no response found";

// send response to webhook function
async function sendToWebhook(payload) \{
    const webhookUrl = `https://webhook-test.com/${key}`;

    const response = await fetch(webhookUrl, \{
        method: 'POST',
        headers: \{
            'Content-Type': 'application/json'
        \},
        body: JSON.stringify(payload)
    \});

    if (!response.ok) \{
        throw new Error('Webhook POST request failed');
    \}
\};

async function execute_process() \{

    const response = await sendToWebhook(payload); // send webhook
    return \{
        [`${get_entity_string()}.response_result`]: response ?? "no response"
    \};
\};
Confirm Creation
Select Yes and click Submit
### Create with JSON
Alternatively, creation can also be achieved by selecting the "Show JSON" box on the top toolbar. Then, paste the following content and update the organization_id.
JSON
```json
{
  "organization_id": "<replace_organization_id>",
  "name": "tutorial_send_response",
  "partition": "response",
  "description": "",
  "tags": [
    "service_tutorial"
  ],
  "code": "//get key\nconst key = __tutorial_webhook_key;\n\n//get response\nconst payload = _this.response ?? \"no response found\";\n\n// send response to webhook function\nasync function sendToWebhook(payload) {\n    const webhookUrl = `https://webhook-test.com/${key}`;\n\n    const response = await fetch(webhookUrl, {\n        method: 'POST',\n        headers: {\n            'Content-Type': 'application/json'\n        },\n        body: JSON.stringify(payload)\n    });\n\n    if (!response.ok) {\n        throw new Error('Webhook POST request failed');\n    }\n};\n\nasync function execute_process() {\n\n    const response = await sendToWebhook(payload); // send webhook\n    return {\n        [`${get_entity_string()}.response_result`]: response ?? \"no response\"\n    };\n};",
  "imports": [],
  "parameters": ["__tutorial_webhook_key"],
  "language": "JavaScript",
  "version": "latest",
  "search_resource_type": "code"
}
```
Create Invoke Point
On the experts page, click the + next to "Invoke" to create a new invoke point. Enter the following required information:
Metadata
- Name:
tutorial_send_response - Partition:
response
Inputs
We will define two inputs.
Input 1
- Path:
task.intent - Operator:
equals - Value:
customer_service - Description:
Task is for customer service demo
Input 2
- Path:
_this.response - Operator:
exists - Description:
Tutorial response exists
Tags
- MelodyArc Tags:
service_tutorial
Attributes
We will define one attribute.
Attribute 1
- Key:
friendly_name - Value:
Tutorial - Send Response
Code
- Code:
tutorial_send_response
Confirm Creation
Select Yes and click Submit
### Create with JSON
Alternatively, creation can also be achieved by selecting the "Show JSON" box on the top toolbar. Then, paste the following content and update the organization_id.
JSON
```json
 {
  "organization_id": "<replace_organization_id>",
  "name": "tutorial_send_response",
  "partition": "response",
  "description": "",
  "tags": [
    "service_tutorial"
  ],
  "inputs": {
    "task.intent": {
      "evaluate": "=customer_service",
      "description": "Task is for customer service demo"
    },
    "_this.response": {
      "evaluate": true,
      "description": "Response exists"
    }
  },
  "attributes": {
    "friendly_name": "Tutorial - Send Response"
  },
  "code": "tutorial_send_response",
  "search_resource_type": "invoke"
}
```
Task Serviced
You should see the response appear on Webhook Tester.
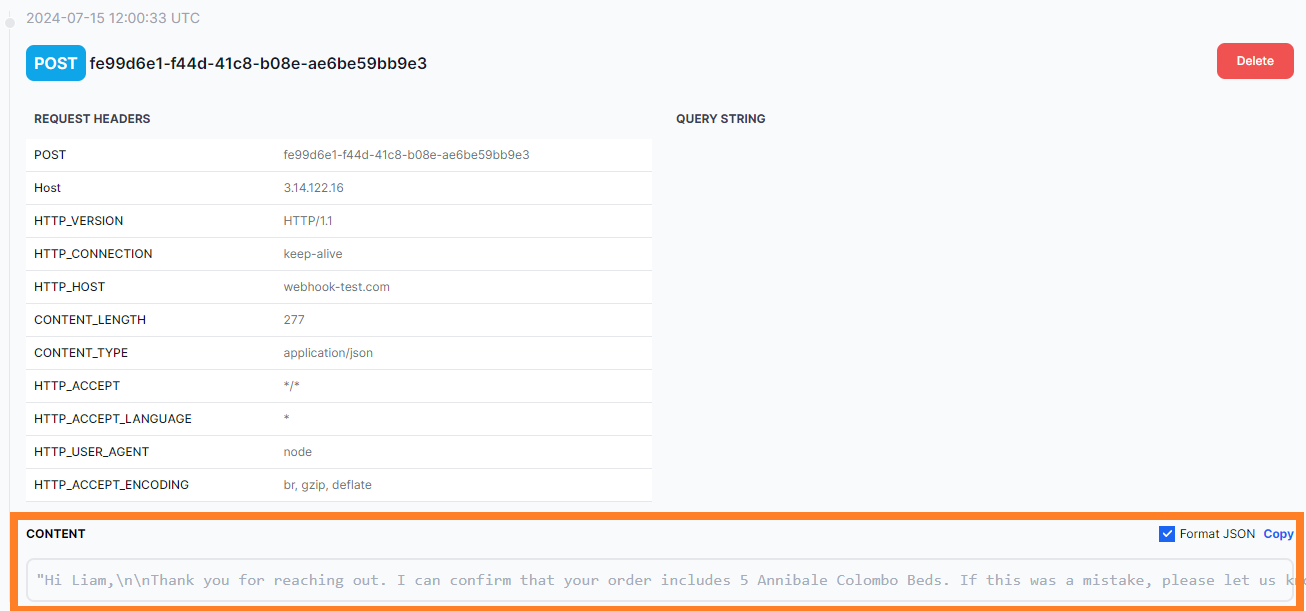
Complete
You have completed the tutorial and successfully created a full service flow! 🥳
The concepts learned are the same used in production builds that service thousands of tasks. Please explore the MelodyArc Platform and Resources documents to learn more.